반응형
0. npm 패키지 설치
npm install @discordjs/rest discord-api-types두 패키지를 설치해준다.
1. commands 폴더 및 명령어 생성

discordjs 프로젝트 폴더에 commands 폴더를 생성하고, 그 안에 명령어 파일을 추가한다. 나는 테스트를 위해 ping.js를 추가했다.
const { SlashCommandBuilder } = require('@discordjs/builders');
module.exports = {
data: new SlashCommandBuilder()
.setName('ping')
.setDescription('Replies with Pong!'),
async execute(interaction) {
return interaction.reply('Pong!');
},
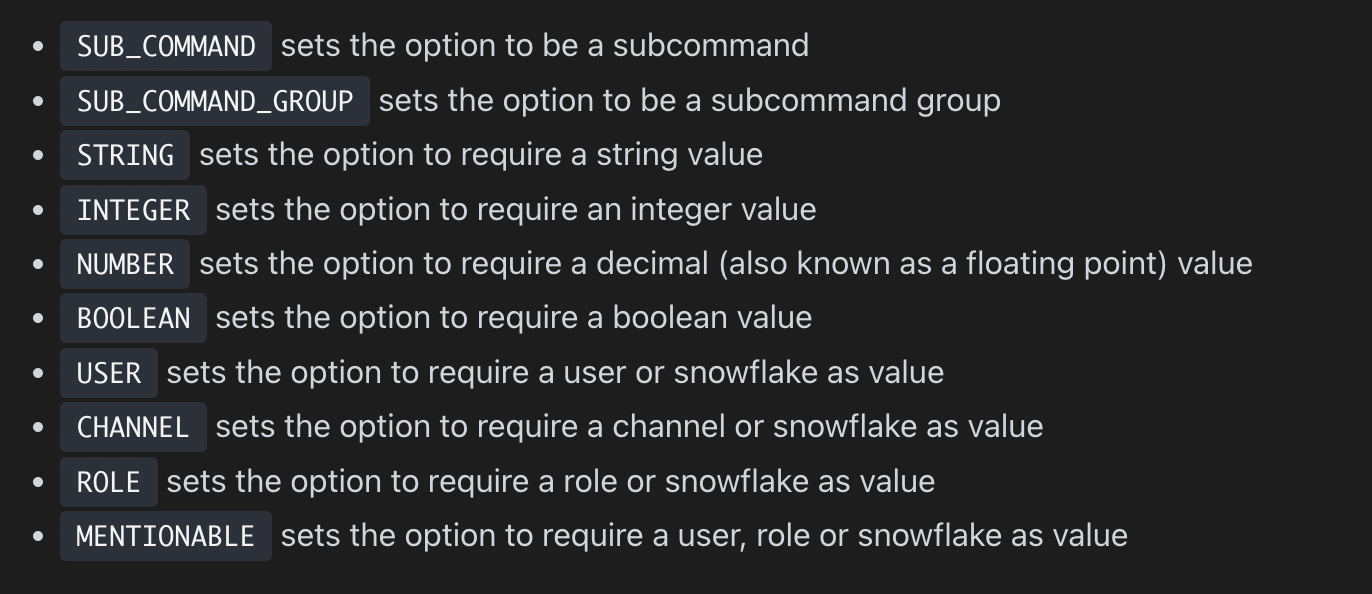
};data 부분은 명령어의 이름과 세부사항을 담고 있다. Option들의 타입은 다음과 같다.
async execute는 client의 상호작용 listner로부터 매개변수를 받아 함수를 실행한다.
2. 명령어 적용하기
import fs from "fs";
const { REST } = require("@discordjs/rest");
const { Routes } = require("discord-api-types/v9");
const { Client, Collection, Intents } = require("discord.js");
const { clientId, guildId, token } = require("./config.json");
const client = new Client({ intents: [Intents.FLAGS.GUILDS] });
REST와 Routes API를 불러온다.
const commandFiles = fs
    .readdirSync("./commands")
    .filter((file) => file.endsWith(".js"));

const commands = [];

client.commands = new Collection();

for (const file of commandFiles) {
    const command = require(`./commands/${file}`);
    commands.push(command.data.toJSON());
    client.commands.set(command.data.name, command);
}

client.once("ready", () => {
    console.log("Ready!");

    const CLIENT_ID = client.user.id;
    const rest = new REST({ version: "9" }).setToken(token);

    rest.put(Routes.applicationCommands(CLIENT_ID), {
        body: commands,
    })
        .then(() =>
            console.log("Successfully registered application commands.")
        )
        .catch(console.error);
});
commandFiles에 commands 폴더 내에 있는 명령어들을 불러오고, 명령어들을 디스코드에 적용한다. 이때 만약 특정 서버에만 명령어를 적용시키고 싶다면 아래와 같이 변경해주면 된다.
rest.put(Routes.applicationCommands(CLIENT_ID), {
-> rest.put(Routes.applicationGuildCommands(CLIENT_ID, guildId), {
client.on("interactionCreate", async (interaction) => {
if (!interaction.isCommand()) return;
const command = client.commands.get(interaction.commandName);
if (!command) return;
try {
await command.default.execute(interaction);
} catch (error) {
console.error(error);
await interaction.reply({
content: "There was an error while executing this command!",
ephemeral: true,
});
}
});봇이 상호작용할 때 작동한다. 명령어를 추출한 뒤, interaction을 인자로 명령어 파일을 실행한다.
반응형
'Study > DiscordJS' 카테고리의 다른 글
| The Patch - 게임 패치노트 전용 디스코드 봇 (FC온라인, 롤, 로스트아크, 배그, 메이플, 발로란트, 오버워치2 지원) (0) | 2022.03.22 |
|---|---|
| 4. DiscordJS client.on 이벤트 정리 (0) | 2022.02.23 |
| 2. DiscordJS 기본 코드 리뷰 (bot.js, kick.js) (0) | 2022.01.26 |
| 1. DiscordJS 시작하기 - 설치 및 봇 생성 (0) | 2022.01.25 |